First Trailer set up - any eagle eyes see a problem?

Had another thread from a few weeks ago, but that account was hosed up so bad that PWRA tech support could not get me in, so new thread here.

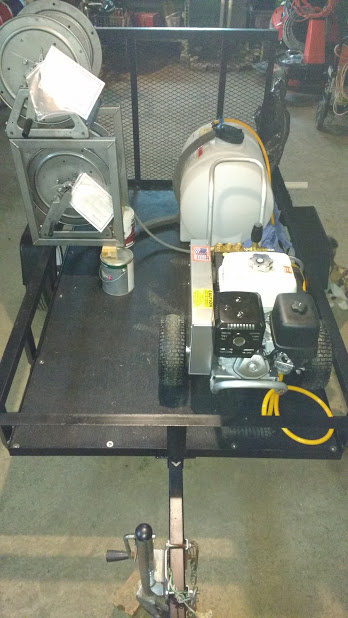
Finally have all the equipment on hand (surface cleaner coming later this summer) to put together the trailer. Still need to go buy some random bits like bolts, elbow, etc but the main pieces are here.

5.5 gpm belt drive unit for residential cold wash only… no roofs

***NOT driving with water… I am in a class 1 hitch situation, and limited to 1k in total trailer weight and 200lbs tongue weight - until I can get a truck. Until then, I want to keep weight down well under 1k. so not driving around with water, except for whatever won’t drain easily - maybe few gallons. So the tank in the direction I have it should not be an issue with the sloshing and tank design.

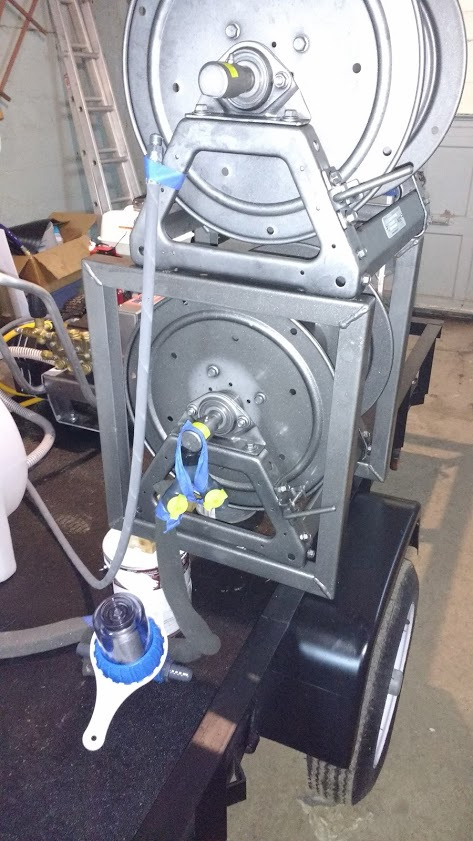
*** Not welding hose reels, so that I can upgrade easily to a bigger trailer as soon as funds permit (after the truck purchase), so will be bolting them to wood initially.

***Also keeping the protective bar on front of PW. Might remove the handle, but may need to use this trailer on rare occasion to get the rider mower to repair shop, so wheels are not coming off until I get my bigger trailer. Will bolt it down to floor.

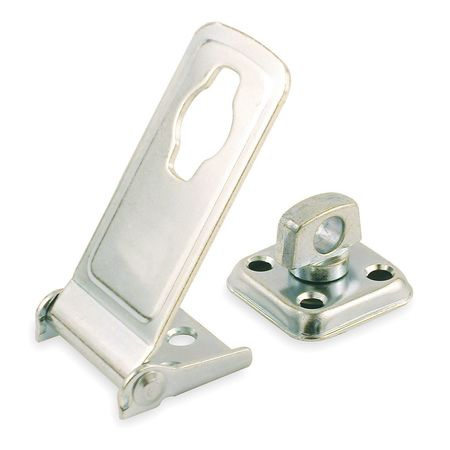
I am going to get a board a little taller than the PW to put along the front of the trailer in front of the pressure washer to protect it from damage while driving. I will secure the board to the trailer with some type of a latch so I can easily slip it off when I get to the job so the PW can vent into air and not the board. Will probably use a latch hasp like this one:

image

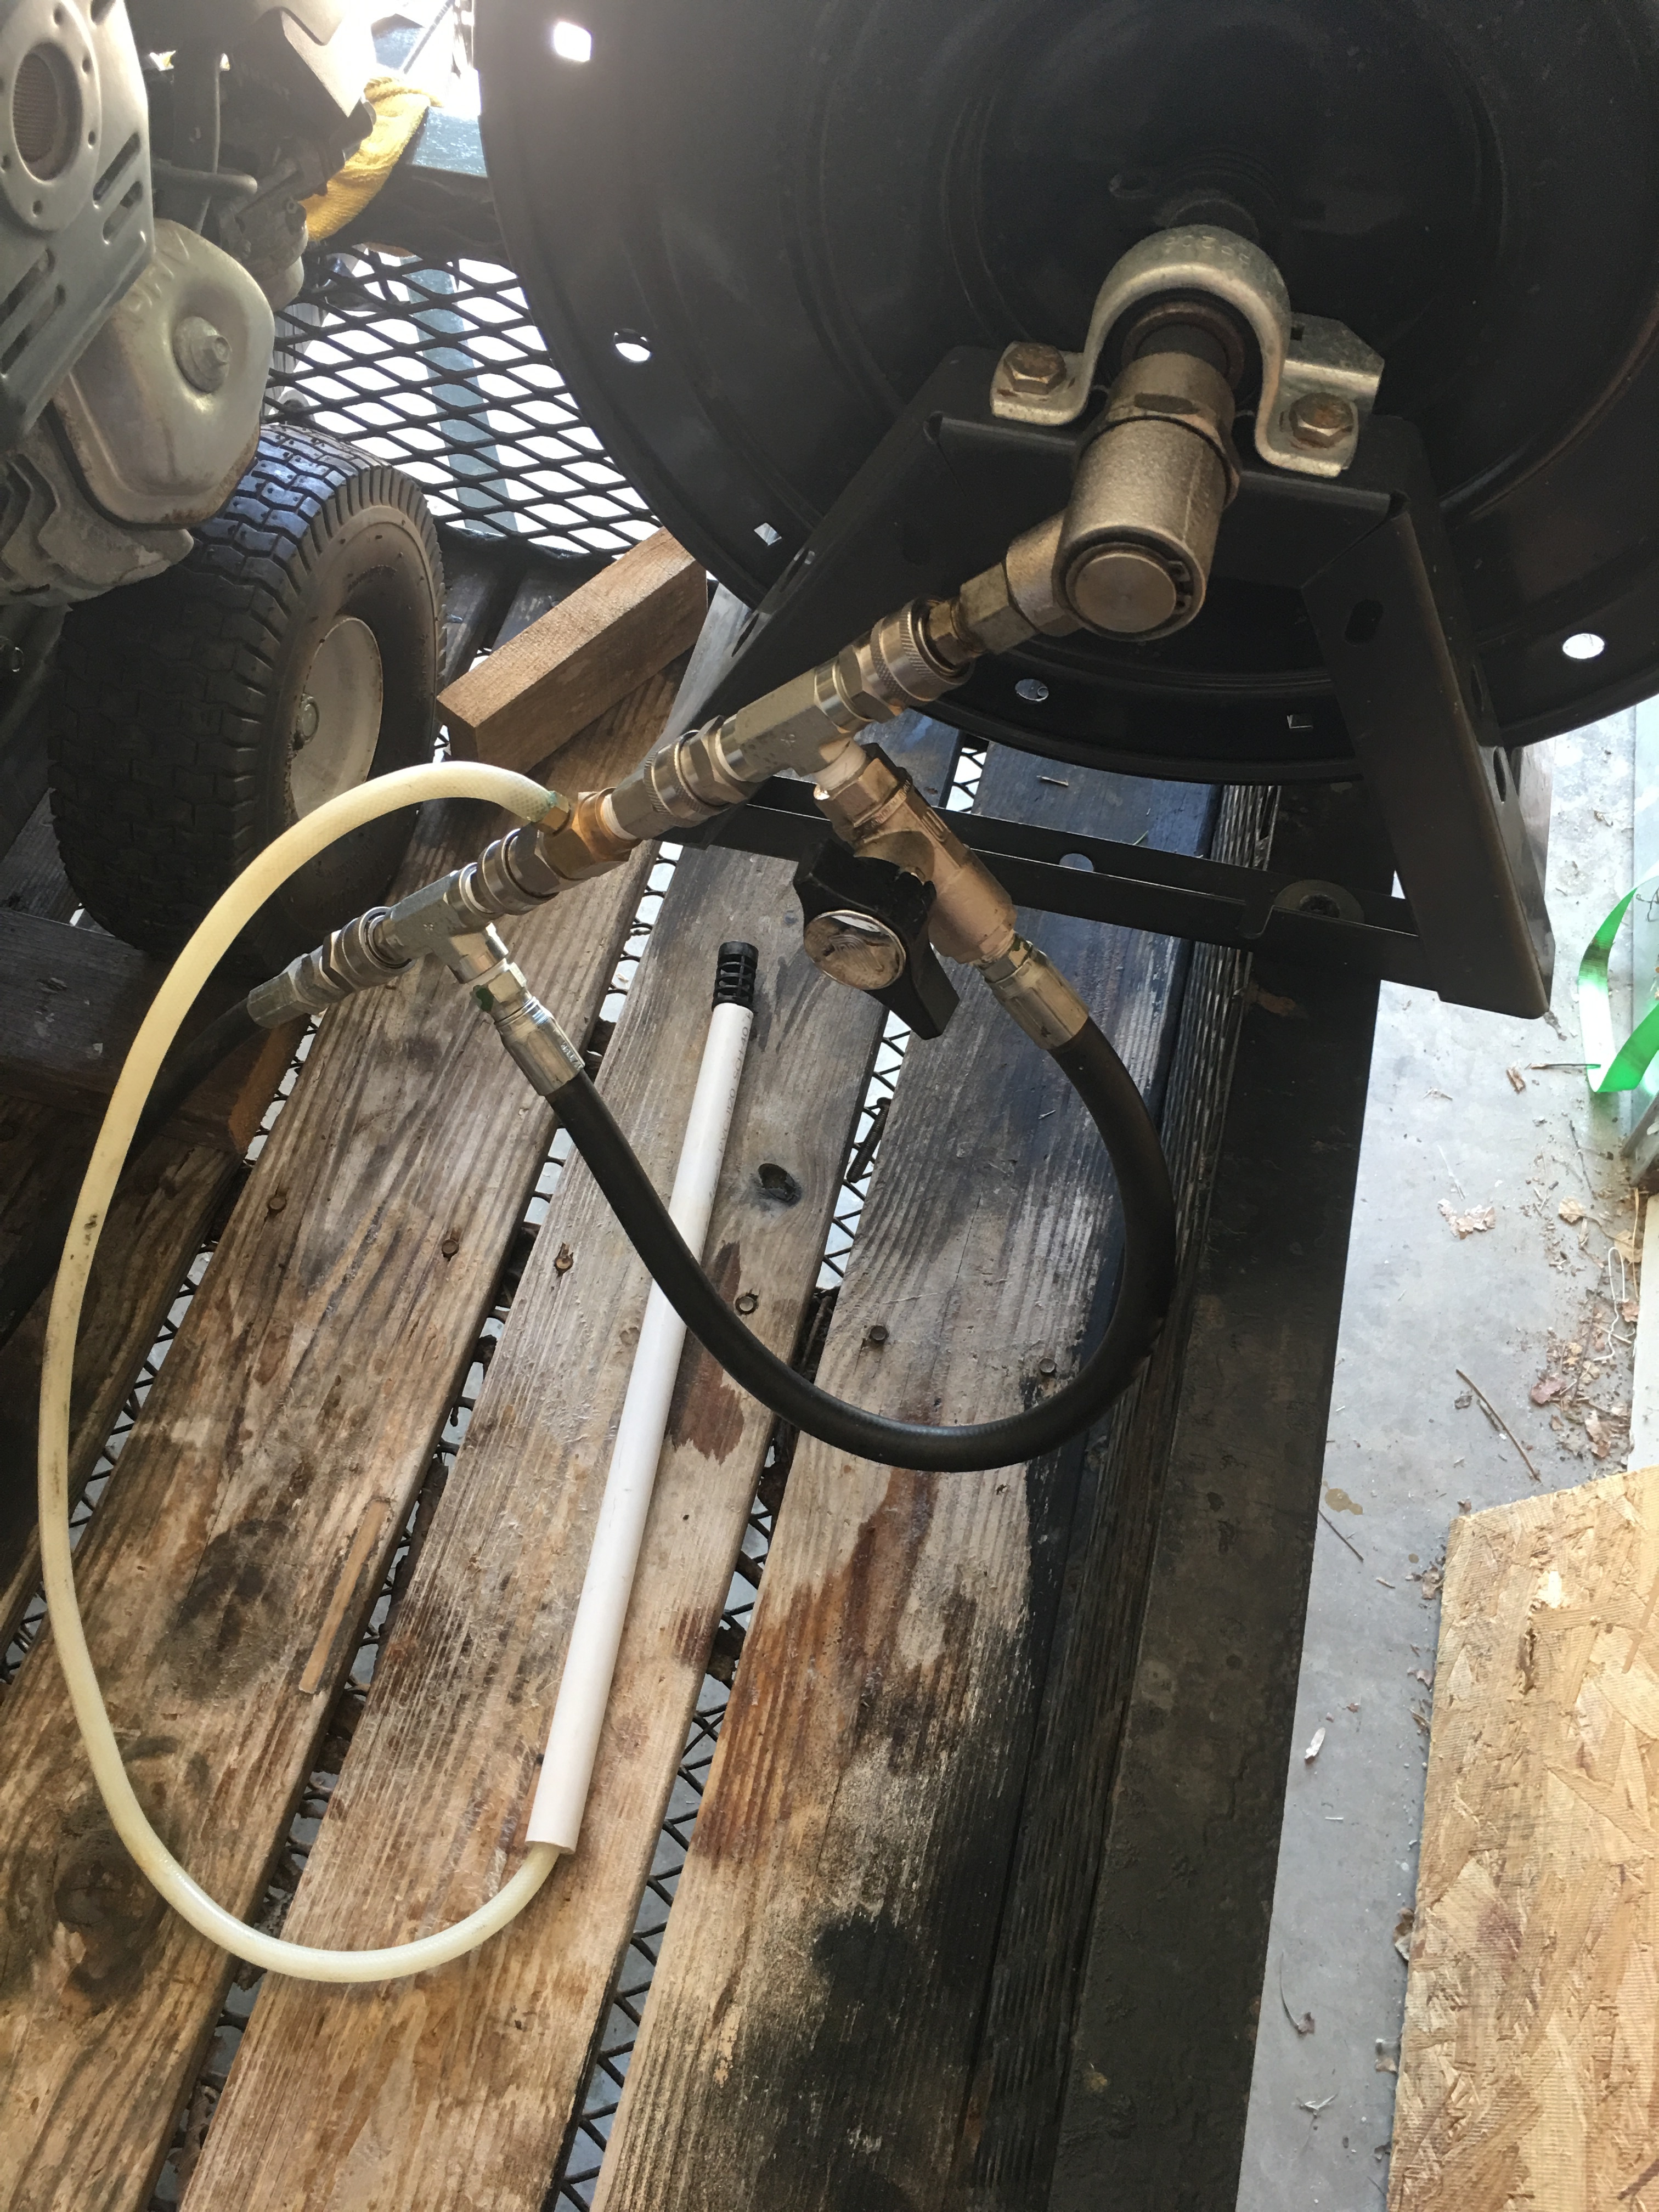
The filter is now going between the tank and the PW (thank you IBS), so the supply line from the reel will just be the 1" crushproof (it is being represented by a piece of square foam in this picture). Is the 1" too big to use? Want to use the crushproof so I can lay my surface cleaner on the floor in front of the tank and PW and not have to worry about it restricting flow.

I am running supply through the reel to start with, and see how it goes. Some say it will restrict my flow too much, some say it won’t… will fiddle with testing it down the road sometime. The other part of the Y splitter will be a short garden hose for bucket filling, clean up etc.

I will have a drain coming out the back of the tank and will have more 1" crushproof with garden hose nozzle as the drain… not that rigid pvc.

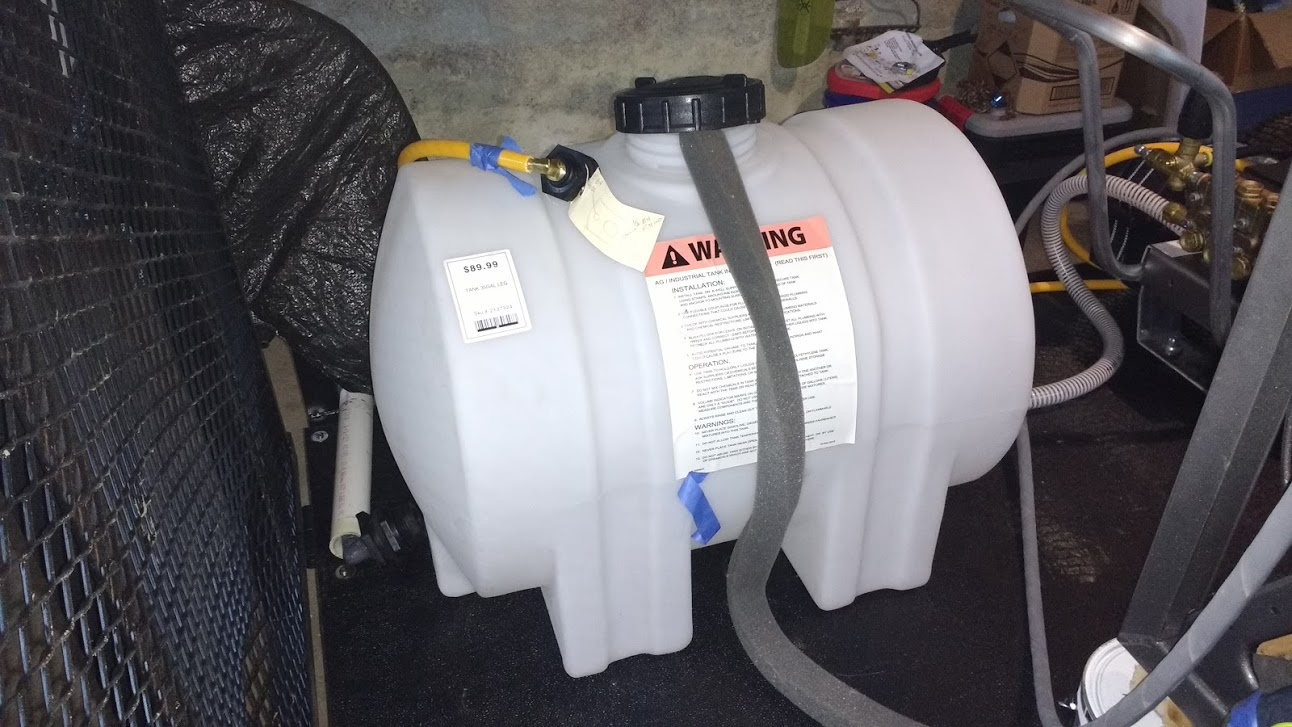
I was told I need 20" of crushproof between the filter and the PW… so I will put the filter there between the two, after a small shut off valve to allow cleaning the filter easily even if I have water in the tank. Anyone have a good, small shut off valve they like? The one I have is kind of giant…

Will be putting an elbow inside the tank to direct bypass to end of tank opposite the PW feed line. Hudson valve is going into the tank lid.

Not sure where to mount the downstream injector…at the hose reel maybe… not 1005 of pros and cons on that yet but want to minimize connections and such to just what is needed.

I think I am safe on weight distribution with the stacking reels over the axle. Do they need to come father forward? Wanting to be able to use that fender to help with mounting.

Thinking my box of chemicals (currently single gallon bottles of SH - only working 2 days a week this summer) will go in the front corner, adding some tongue weight but not a ton.

Spare tire, extra 50’ of PW hose and supply hose rides in the trunk.

Will probably add a small vice to the front and mount a plastic tool box for a few immediate need items like safety glasses, o-rings, gloves, small first aid, etc.

any feedback/guidance appreciated.

2 Likes

I’m also in the process of a new trailer build.

One thing to keep in mind about the towing weight is you have to take into account the weight of the trailer. So, if your vehicle is only suppose to tow 1000 lbs, that’s not just what’s on the trailer but the total of everything.

As far as the chemical injector most install it on the hose reel using quick connects. You want to be able to quickly swap it out when it fails.

If mounting the hose reels over the fender make sure the weight isn’t on the fender at all. From the picture it looks like you have it in a good spot because the weight is on the side rail. Trailer fenders aren’t made to support any weight and two hose wheels probably weigh 100 lbs or so.

Have you thought about buying a universal ladder rack? You could probably bolt it to the side rails. There will more than likely be times when you will need a ladder so I would definitely figure something out. I’ve seen them on Amazon for like $60.

Seems like you have things figured out and is looking good.

I haven’t read about having the filter 20" away from the pump. Can you point me to the thread or explain the reasoning behind it? Seems like water would flow the same whether it’s 5" away or 20" away but I personally have no idea.

1 Like

Marinegrunt, I appreciate all the input you have provided over these last weeks!

Will be happy when we are both up and running!!

Yes, the trailer is 325lbs so that really limits what is going to be carried on it. I thought about a ladder rack but worried about the weight of it. I have a 2 section aluminum window cleaners ladder (used to be a window cleaner) that will actually fit in the car along with a small step ladder.

Once I get the trailer rigged up, I am going to the local scale and weighing the vehicle then come back with the trailer to get a real read on the weight of the trailer so I can move ahead with adding stuff safely.

thanks for the point about the fender. Might just put down some rubber on top of that fender to fill the little gap.

The 20" comes from Rex down in FL - here is their website and a nice image for plumbing up stuff. I bought his kit cause I just couldn’t see the point in trying to ensure I got the right stuff… the extra $ was worth it to me.

https://www.pressurewasherproducts.com/pressure-washer-plumbing.html

Thanks and keep me posted on your build!

I’ve talked to Rex a few times. I had to call him about a pump on an older Karcher hot water unit I plan on selling. It had a built in unloader but was having issues even after rebuilding it. He told me how I could tap some holes in some of the tiny passageways and screw in some tiny hex socket plugs. I also had to take out a valve, disc, ball, and spring and basically get rid of and bypass the built in unloader. I was the able to mount a separate unloader on a block. It works great now. All I talked to him about was pumps but he sure knows his stuff there. He always called back when I left a message or emailed him. I’ve been very happy with their customer service both on the phone and when ordering.

1 Like

This is how I have my chemical injector setup. I do notice a difference with the injector bypass kit. Another pic of my filter between the pump and tank…it gets great flow

1 Like

I would suggest an unloader block and longer hose between filter and pump

2 Likes

I have my filter on the pump, haven’t noticed any shortage on water flow because of it.

1 Like

I am not familiar with an “unloader block” will need to look that up… was that for me or Barry1… cannot tell by the way my thread looks…lol

For Barry but if you dont have one, get one

Thanks, will look into it!

Just out of curiosity what is the purpose if the ball valve between your supply tank and machine.

I have it so my pump is always primed

If your tank is full and you have an issue with your filter it will allow you to shut the water to the filter so you can service it.

1 Like

That too

I suggest screwing down a 2 x 4 in front and in back of the wheels of your PW. Wheel Chocks that can be removed easily when you need to move tractor around. With alittle planning, You could position the 2 X 4s in a way that they would benifit you for the tractor and PW also. Jusy a thought. Good luck to ya.

2 Likes

Oh yea that is a good idea, thanks much!

I see. Makes sense. I have 55 gal buffers so usually just leave them full.

Not real clear on injector bypass… doesn’t it require you to go back to the rig and turn the valve to start or stop soap? Seems like that would be as, or more, time consuming than the restriction in flow… am I misunderstanding it? Watched a video of a guy turning the valve to start and stop soap…

1 Like

I stopped using my low pressure rinse tips…it’s a little too much pressure for rinsing siding …especially for oxidized siding. So I use my soap tips to rinse (now I use a M5DS tip for both soaping and rinsing which is awesome). The injector bypass allows more water flow when rinsing or running a SC. Yes you do have to walk back to the machine but the house mix needs to dwell a bit anyways. Once you get a system down it works well. Even the low pressure rinse tips on the j-rod have too much pressure to apply to siding in my opinion.

3 Likes

So… trailer is FINALLY (omg) up and running. Did my first job with it… 2 story 1908 house with full attic so high peaks, plus 1500 sq office, garage and 2 outbuildings. All worked great except the rinse tips pulled soap no matter how long I let the water run to clear the lines… not sure if different tips or different injector is needed. Got the standard set up from Pressure Tek for the 5.5 gpm pressure pro. Using the proceeds to get support frame for hose reels and a sign for the gate of the trailer and resolve the need to return to the trailer between every soap and rinse!

Little buffer tank worked great even though I screwed up and put the majority of the bulkhead on the outside of the lid instead of inside…lol… flexilla actually kinked on me but the buffer tank saved me.

Appreciate all the help getting it running. The handles on the Hannay reels are CRAP… they don’t even match each other… kinda like they had random stuff laying around and said hey put this on there… not impressed for the $$$$$$… put a decent handle on… also one of the locking pins sticks - straight outta the gate… but they are def sturdy! Already love the Y splitter for the hose reel!

You all rock!

5 Likes